The Journalist: A Simple Responsive Template for Blogger
This quick loading theme is free and comes pre-installed with a simple text-based related posts and social sharing widget. It is ideal for journalists, writers and bloggers alike.

DemoDownload
Profile Box
To add details about yourself in the Profile box on the sidebar, find the following code in the template and replace the information in blue with relevant details about yourself.<div class='profile-box'> <!-- Insert Link of your Profile Pic --> <img class='img-responsive pimg' src='https://blogger.googleusercontent.com/img/b/R29vZ2xl/AVvXsEh6Ar27ciiJvp48sxWOTsAFpqZeTSd0oF5YEepKEUU_NYNjBzY3nRPznihZwtfObn1gtYD84aVLZN22KZynnbf4OWeJbdShIca1DkGPi-LQKobIJxogtuh8awzjyDNoAJxcS5wMb19DQ1Q/s320/default-avatar.png'/> <!-- Add Name Here --> <h4>Wajahat Razzaq</h4> <!-- A line About Yourself --> <span>Writer, journalist and a budding academic. I write for the Huffington post.</span> </div>
Social Links
Link the social icons in the sidebar to your social profiles by modifying the following code in your template. Simply change the code in blue with relevant links to your social accounts.<div class="contact-box"> <a href="mailto:wajahat-xyz123@gmail.com?Subject=Hey!" target="_top"> <i class="fa fa-envelope-o" rel="tooltip" title="wajahat-xyz123@gmail.com"></i> </a> <a href="https://twitter.com/wajahat-xyz" target="_blank"> <i class="fa fa-twitter"></i> </a> <a href="https://facebook.com/wajahat-xyz" target="_blank"> <i class="fa fa-facebook"></i> </a> <a href="https://plus.google.com/wajahat-xyz" target="_blank"> <i class="fa fa-google-plus"></i> </a> <a href="https://youtube.com/wajahat-xyz" target="_blank"> <i class="fa fa-youtube-play" rel="tooltip" title="YouTube"></i> </a> </div>
Thats it! Please let us know of any anomalies / layout problems that you may find in the template.
New Free Responsive Blogger Templates 2014 [Download Now]
We've previously shared some of the best free responsive templates available for blogger here and here. As more excellent themes are now available for your blogger based blog, here are some select new ones that you can download for free.
Xmax

Xmax is a multi-purpose one page Blogger template. It is specially great for your portfolio or company product site.
DemoDownload
BTNT

A decent minimalist responsive blogger theme.. It is ads-ready and comes with pre-installed popular posts and recommended posts widget.
DemoDownload
Hola

Another Clean, adsense ready responsive template with a right sidebar.
DemoDownload
Linzo

An incredibly neat theme with the post thumbnails displayed on the homepage right below the post title. Features a right sidebar loaded with email subscription widget, popular posts widget and social media icons.
DemoDownload
Camly

Blogger theme with a nice responsive layout and wide sidebar on the right. It also features an optin form that rolls down when you click the plus sign below the header.
DemoDownload
Ravia

Responsive Magazine-style blogger template with featured post area below the header on homepage. It also comes with built-in popular post widget.
DemoDownload
Wizz

A Responsive, fast-loading theme featuring a 3 column layout.
Demo
HelperTricks v1

Clean theme with a single sidebar floated right. This theme is great for technology blogs.
DemoDownload
RealMag

100% Responsive, fluid-width template with a magazine-style layout. You can use it for almost every niche you may cover.
DemoDownload
Journal

Journal is a perfect Blogger template for those who love to travel and blog. It has grid layout with fluid responsive display. It features a left sidebar.
DemoDownload
Personal Mag

Personal Mag - is a clean responsive Blogger blog theme. If you are looking for a pinterest style blogger theme, personal mag may do the job for you.
DemoDownload
Awesome Mag

Awesome Mag Blogger Template is fully responsive, 3 column template that can be used for a portfolio, magazine, personal blog or a list based site.
DemoDownload
Rich Pins: Show Post Title, Prices, Ratings and More On Pinterest
Since, for most users, getting visitors from Pinterest to our own web pages is the primary reason for using this incredibly popular social media site, there's no reason not to try every trick in the book to make our pins more engaging.
A lot of shared content on Pinterest has the title displayed of the webpage from where the content is actually pinned from, the prices of products, rating from sites covering movies and a lot of other useful information. This makes your pins even more appealing, more informative.

Pinterest introduced this feature as 'Rich Pins'. And it isn't reserved for select sites. You too can enable this feature to display the post title, prices, recipes, movie ratings and more and reap the benefits associated with it. The only condition is that you should be using Pinterest as a business account. If you are a blogger, you can convert your account type to business here: business.pinterest.com/en/
How to Apply For Rich Pins on Pinterest
Pinterest has a detailed guide on applying for Rich Pins here.
1. Once you have your account type set to business, decide what kind of Rich Pin you want to apply for:
2. Next use oEmbed or Semantic Markup (Schema.org or Open Graph templates) to mark the relevant tags in your templates (prices, article title, movie ratings, recipes etc) as detailed in the links above.
3. Once properly marked, visit the Rich Pins Validator and enter the URL of a post from your site. Hit Validate. It should say that your pin has been validated.

4. Finally, click the 'Apply Now' button to apply for Rich Pins to be enabled for your account. Once approved, it will show a message notifying you about the approval.
Top Responsive Blogger Templates 2014 You Can Download for Free
Here are a number of excellent new templates that you can download for free in 2014 if you're just starting on a blog or moving your existing site to a responsive design:
Portfolio Blog
NotePlus Template is a beautiful, free and fast loading blogger template build using Bootstrap. It features a 2 column layout with the sidebar on the right.

Details
Portfolio Blog
Portfolio Blog: As the name suggests, this is a portfolio style template with an elegant and clean design powered by the Isotope jQuery plugin. It features a full width layout with no sidebars and supports 4 widget sections in the footer.

Demo / Download
Blog Safari
A clean magazine style theme with a fluid width/responsive layout designed to adjust well on all screen sizes. It comes with pre-installed Blogger Comments and Google+ Comments system which you can use alternately. An author bio box is displayed at the end of every post - A feature preferred for multi-authored blogs.

Demo / Download
Gadget Mag
Gadget Mag is magazine style blogger template with a Responsive design that adjusts well on all common screen sizes. It features a 3 column layout with powered with jQuery and CSS3. It comes with plenty of pre-installed widgets including thumbnail based featured and popular posts.

Demo / Download
Perk Misty
Perk Misty is another excellent responsive blogger theme ideal for News/Magazine sites, portfolio and even your personal blog. It features a 3 column layout and comes with a pre-installed, customizable recent post widget. Apart from that, the template is totally Adsense ready.

Demo / Download
Docorus
Docorus is pretty-much adapted from the Hueman theme available for wordpress. It features a 3 column, full width, responsive magazine-style design. Docurus pre-includes related, popular post widgets, author bio box and and image slider on the homepage. No matter which niche you're covering, this is a great template you can have.

Demo / Download
Foodie
Foodie, as the name suggests is intended for use on blogs covering food recipies, cooking tips ets. This is yet another theme with a magazine style design. Like all other templates here, it adjusts to all major screen sizes (desktop, pads and mobile phones) and is SEO friendly.

Demo / Download
Enpine
Enpine is a large width template with no sidebar on the home page, the post pages feature a right sidebar with a pre-installed popular post plugin. The template comes with a sticky header for easy navigation. An author box linked to your Google+ account is displayed at the end of every post pages.

Demo / Download
Plazify
Plazify is a fully responsive, quick loading magazine-style theme with two sidebars on the right and includes a slider on the homepage. It is available as both, free and paid. However, the free version does not allow for any customization.

Demo / Download
Sleekify
Sleekify, another cool magazine theme with a sleek look. It features a two column layout with a right sidebar. A $19.99 paid version of theme allows for customization, footer credit removal and support.

Demo / Download
BlackPress
Blackpress by Templateify is a 100% responsive portfolio-style template for your blogspot blogs. It is retina ready and offers is a super clean look with a two column (Right-sidebar) layout. The template is free for use, however if you need to customize it, there is a $19.99 licensed version just for that.

Demo / Download
Portify
If you are looking for a clean, minimalistic blogger template with a responsive layout, Portify is one amazing template you can consider. It features a left sidebar and a widget area on the top. Like all other tempelateify themes covered here, a $19.99 version of this theme allows for customization.

Demo / Download
Wedding Magazine
Wedding Magazine by 'Templateism' features a very clean magazine style design with large image banner on the homepage. Its a 2 column theme with 4 a column footer. The theme is 100% responsive and adjusts well on all screen sizes. Pre-includes related and popular post widgets.

Demo / Download
Gagism
If you intend to run a gag, meme or any image site on blogspot, Gagism by Tempelateism is the best theme you'll find. It features related items below every post, rating system, social buttons and lots of other goodies. Plus there is a Re-blog Button that allows your visitors to share your gags on their blogs while giving a backlink to your site. This will make your gag go viral across different blogs.

Demo / Download
Droid Pluss
Simple, elegant and 100% responsive. Droid Pluss is the perfect choice for a technology blog or news site. The theme includes a colored sidebar on the right, related post plugin, social sharing buttons and more.

Demo / Download
Belastic
Belastic is another nicely designed template for desktop and all mobile devices. It offers unlimited color schemes, thumbnail based post summaries, drop down navigation menu, social sharing widget and more.

Demo / Download
Arvo
Arvo is a two column theme with a grey background. Its a fast loading, SEO optimized blogger theme with couple of handy pre-installed widgets and offers easy customization.

Demo / Download
Display Code On Your Blog With Highlight.js & Prettify (Syntax Highlighters)

Using Prettify
The Prettify script is hosted on Google, so you don't even need to host it on your end. Simply add the following code before the closing </head> tag in your template:
<script src="https://google-code-prettify.googlecode.com/svn/loader/run_prettify.js">Marking code sections:
Now whenever you display code on your page, simply enclose it in <pre>...</pre>, <code>...</code> or <xmp>...</xmp> tags with a class of "prettyprint". Here's an example:
<code class="prettyprint">
...YOUR_CODE_HERE...
</code>
Selecting Styles:
If you don't like the default skin, there are 4 other styles you can choose from (Available here):
<script codearea2="" src="https://google-code-prettify.googlecode.com/svn/loader/run_prettify.js?lang=css&skin=SKIN_NAME></script>To select a different skin, change SKIN_NAME in the code above with the actual skin name. Available skins include: doxy, sons-of-obsidian, sunburst and desert.
Using Highlight.js
Just like Prettify, highlight.js is another great syntax highlighter for the web that you can use to make your code look beautiful. Plus, it offers a lot of styles to choose from. To use highlight.js, add the following code before the closing </head> tag in your template.
<link href="http://yandex.st/highlightjs/8.0/styles/default.min.css" rel="stylesheet"></link>
<script src="http://yandex.st/highlightjs/8.0/highlight.min.js"></script>
<script>hljs.initHighlightingOnLoadundefined);</script>
Marking code sections:
Using the code above will highlight all code you display within
<pre><code>
...
</code></pre>
Selecting Styles:
You can select from 44 different styles. For available style names look into the highlight.js styles directory (don't forget to add ".min" before ".css").
Once you have selected a style, here's how you can apply it to the code:
<link href="http://yandex.st/highlightjs/8.0/styles/ascetic.min.css" rel="stylesheet" type="text/css"></link>
That's it! Your code should now look neat and standout from the text.
Free Embeddable Forums for Blogger & How to Embed These Forums
For users of blogger, there are only a couple of free options available for adding a forum to the site.

Nabble:
Nabble.com, available both in free and paid versions, offers a really simple forum with a neat layout and lots of useful option. Embedding it to your blogger/blogspot site is easy:
- Go to Nabble.com, click 'start a new forum' and fill in the details. Verify your account.
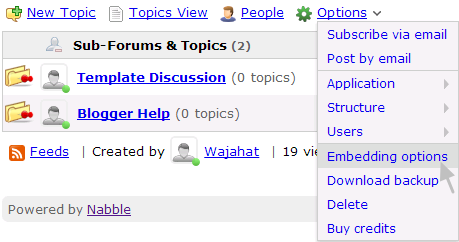
- Create sub-forums by going to Options > Structure > Create New Sub-Forum (Make sure you're logged in).
- Now for embedding, head over to Options > Embedding options.
- Copy the JavaScript code.
- Finally, create a new page on your blog and paste the JavaScript code you copied in step 4 and paste it into the HTML editor mode there.
- Publish your page.

Tal.ki:
Tal.ki by Lefora has been available for quite some time now. Like Nabble, it is also available as free and paid. The paid $5 version comes with no restrictions. However the free version is limited to 15 recent topics and 5 sub-forums. Tal.ki offers a seriously simple way of adding a forum to your website. Just paste the provided code to your page and suddenly the site has a fully functional forum embedded right there. You can load login with your Facebook, Google, blogger and a number of other accounts. The first person to login will become the admin.

Google Groups Forum
If you still have an active online community on Google Groups Forum, you can easily embed the forum on your blog. Simply head over to the HTML editor and add the following code:
<iframe frameborder="0" height="700" width="100%" id="forum_embed" scrolling="no" src="https://groups.google.com/forum/embed/?place=forum/NAME_OF_FORUM#!forum/NAME_OF_FORUM">
Be sure to replace the 'NAME_OF_FORUM' with your actual forum's name on both places.
About Blogger Conditional Tags and How To Use Them Properly
You may wish to hide a widget or element on one page and display it on the other, need to remove the sidebar on certain pages, or even display buttons on select pages. This is exactly where conditional tags come into play. There are a number of tags available for blogger which, if applied correctly, will help you modify elements of your template.

List of conditional tags
The following are a select few conditional tags you'll require the most:- Homepage:
- First post: For targeting the first post on multi-post pages.
- Specific page/URL:
- Posts (item):
- Static pages:
- Index pages (includes homepage, label pages and archive pages):
- Archive pages:
- Posts and static pages:
- Label-search pages:
- 404 Error Page:
- Mobile Pages:
<b:if cond='data:blog.url == data:blog.homepageUrl'>
<b:if cond='data:post.isFirstPost'>
<b:if cond='data:blog.url == "ENTER_URL_HERE"'>
<b:if cond='data:blog.pageType == "item"'>
<b:if cond='data:blog.pageType == "static_page"'>
<b:if cond='data:blog.pageType == "index"'>
<b:if cond='data:blog.pageType == "archive"'>
<b:if cond='data:blog.url == data:post.url'>
<b:if cond='data:blog.searchLabel'>
<b:if cond='data:blog.pageType == "ERROR_PAGE"'>
<b:if cond='data:blog.pageType == "data:blog.isMobile"'>
How to Use conditional tags
Using conditional tags is simple. Each tag needs to be closed with a closing </b:if> tag. All you have to do is select the suitable tag and place the content between the opening and the closing tag like this:
<b:if cond='THE_CONDITION_GOES_HERE'>
...
</b:if>
For Example:
You need to display the content only on Index Pages (homepage, archives and labels page). The following tag will be applied:
<b:if cond='data:blog.pageType == "index"'>
...ENTER CONTENT HERE...
</b:if>
The double equals " == " actually means TRUE. You can change the condition to FALSE, then just replace the first equal with an exclamation sign: " != ".
Reversing a Condition:
Example:
<b:if cond='data:blog.pageType != "index"'>
... THE CONTENT ...
</b:if>
In the example above, the content will show up on all pages other than "index" pages.The ELSE Statement <b:else/>:
In case you need to display alternate content, insert a <b:else/> tag like this:<b:if cond='data:blog.pageType == "index"'> ...Content 1... <b:else/> ...Content 2... </b:if>In the example above "Content 1" will only appear on Index Pages (homepage, archives and labels page), and if its not an Index Page, "Content 2" will be displayed.
Combining Conditions Together:
<b:if cond='data:blog.pageType == "item"'>
<b:if cond='data:blog.url != "URL_OF_POST_TO_EXEMPT"'>
...ENTER CONTENT HERE...
</b:if>
</b:if>
Finally, in the example above, the content will show up on all posts except a certain URL/Post specified.
How to Add Adsense Ads After First Post On Blogger Homepage

Among the several conditional tags available for blogger, one is specifically written to target the first post - a good position for displaying ads. And here's how you too can insert Adsense after the first post on your blogger blog:
The Steps:
- Login to Blogger Dashboard
- Go to Template > Edit HTML
- Find this line of code in your template
- Add the following code just below the code above
- Finally grab a suitable Adsense unit, parse it and add it to the code above
<b:include data="post" name="post">
<b:if cond='data:blog.pageType == "index"'> <b:if cond='data:post.isFirstPost'>---- Replace this line with your Adsense Code -----</b:if> </b:if>
That's it. You can now monitor the newly added ad unit for clicks.
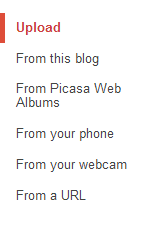
Fix the "Blogger Images Not Uploading" Problem

Clear Browser's Cache:
Start by clearing your browser's cache. Many browser related problems including pages that freeze, don't finish loading, or contain old content can be fixed by clearing your cache.
Disable Plugins:
Disable any Plugins/Extensions on your browser. Plugins may cause incompatibilities with the post editor.
Enable Popups:
Enable popup on your browser or add an exception to blogger.com on your popup blocker. Sometimes popup blockers will prevent the image upload window from appearing.
Enable 3rd Party Cookies:
Make sure all 3rd Party Cookies are enabled in your browser.
Restart your browser:
Once you have tried the above three steps, you may also wan't to try and restart your browser.
Try a different browser:
Sometimes changing your browser may do the job for you. If you are using Chrome, try Firefox, IE or Opera.
Subscribe to:
Comments
(
Atom
)


11 comments :
Post a Comment
Leave A Comment...